
How to make dried Flowers sparkle and shine with…

Have you ever received a beautiful batch of flowers and wished you could maintain their beauty forever? Maybe you’ve had a special occasion like your wedding day, an anniversary, or a just-because moment, and wanted to preserve said flowers and memories forever. Well for me that moment came just recently when I celebrated being a 13-year survivor of breast cancer. Wow, what an incredible journey it's been. The emotional rollercoaster, the physical trauma to my body, the incredible support system I've been blessed with, and the immense gratitude to God for allowing me another day on this planet to celebrate life with family and friends.
On this occasion, I was gifted a gorgeous bouquet of pink roses from my sister which I wanted to cherish forever. So as they began to open just slightly, I decided to capture them mid-bloom and begin the drying-out process. As beautiful as they were alive, I knew they would last even longer dried and “Amberfied.”
This post may contain affiliate links. I may receive a small commission as an Amazon Associate for purchases made through links on this website. I only share links to items that I use or believe in.

Beautiful Pink Roses
The drying-out process.
Remove the flowers before they are fully opened.
Hang the flowers by the stems in a bunch or individually with a string or rubber band.
Hanging them upside down gives the petals a better likelihood of staying intact.
Place them in a dark and ventilated area allowing them to dry for approximately 2-3 weeks. This will keep the sunlight from fading the color.
Watch out for your pets. They love the dried leaves! My kitties are terrible. They’ll chew on the dried out leaves when I’m not watching. (Wait, they chew on them when I am watching too.) Brats!

This one is especially tricky. I’m watching you.

Bunch Dried Out Roses Method.

Single Rose Dried Out Method
You may notice your flowers will start to turn a slightly different hue, especially on the outer petals. This is completely normal and to be expected. Don’t worry when you complete the process, they’ll sparkle and shine in no time.

I love the way my roses turned out! I hung them in a bundle and they really held their color and shape nicely.
What You’ll Need
Your Dried Flowers
Floral Cutters
Paint Brushes
Color Pour Prism Varnish (My absolute favorite varnish!)
Color Pour Gold Paint
Mona Lisa Gold Leaf Flakes in Gold and Multi (Love these gold leaf flakes!)
Tweezers
Green Glitter (Optional)
Silk Velvet Ribbon
Bouquet Pins
Broach or Button
Glue Gun and Glue
( I have a few product pictures at the bottom of this post where you can order some of these amazing products. The rest can be purchased at any crafts store like Michael’s, Joann’s or Hobby Lobby.)

Most of my roses held up nicely.
Once the varnish is applied they become a bit more pliable and you can manipulate them just a tad to suit your vision.
Start by gently removing the string or cutting the rubber band from around your flowers. It’s okay if the leaves fall off or if you lose a few of the petals. This is to be expected. I ended up removing almost all of my leaves on the stems so I could later wrap the velvet ribbon securely around the full length of the stems.

You’ll notice the leaves will fall off pretty easily, but you can use your floral cutters to nip them if some are
stubborn.
I removed almost all my leaves toward the bottom so I could wrap the velvet ribbon securely.

Let’s have some fun!
Dip your paintbrush in the varnish. Lightly brush the varnish where you’d like the gold leaf flakes to appear. You’ll notice tiny specks of iridescence in the varnish. It’s amazing when it drys.
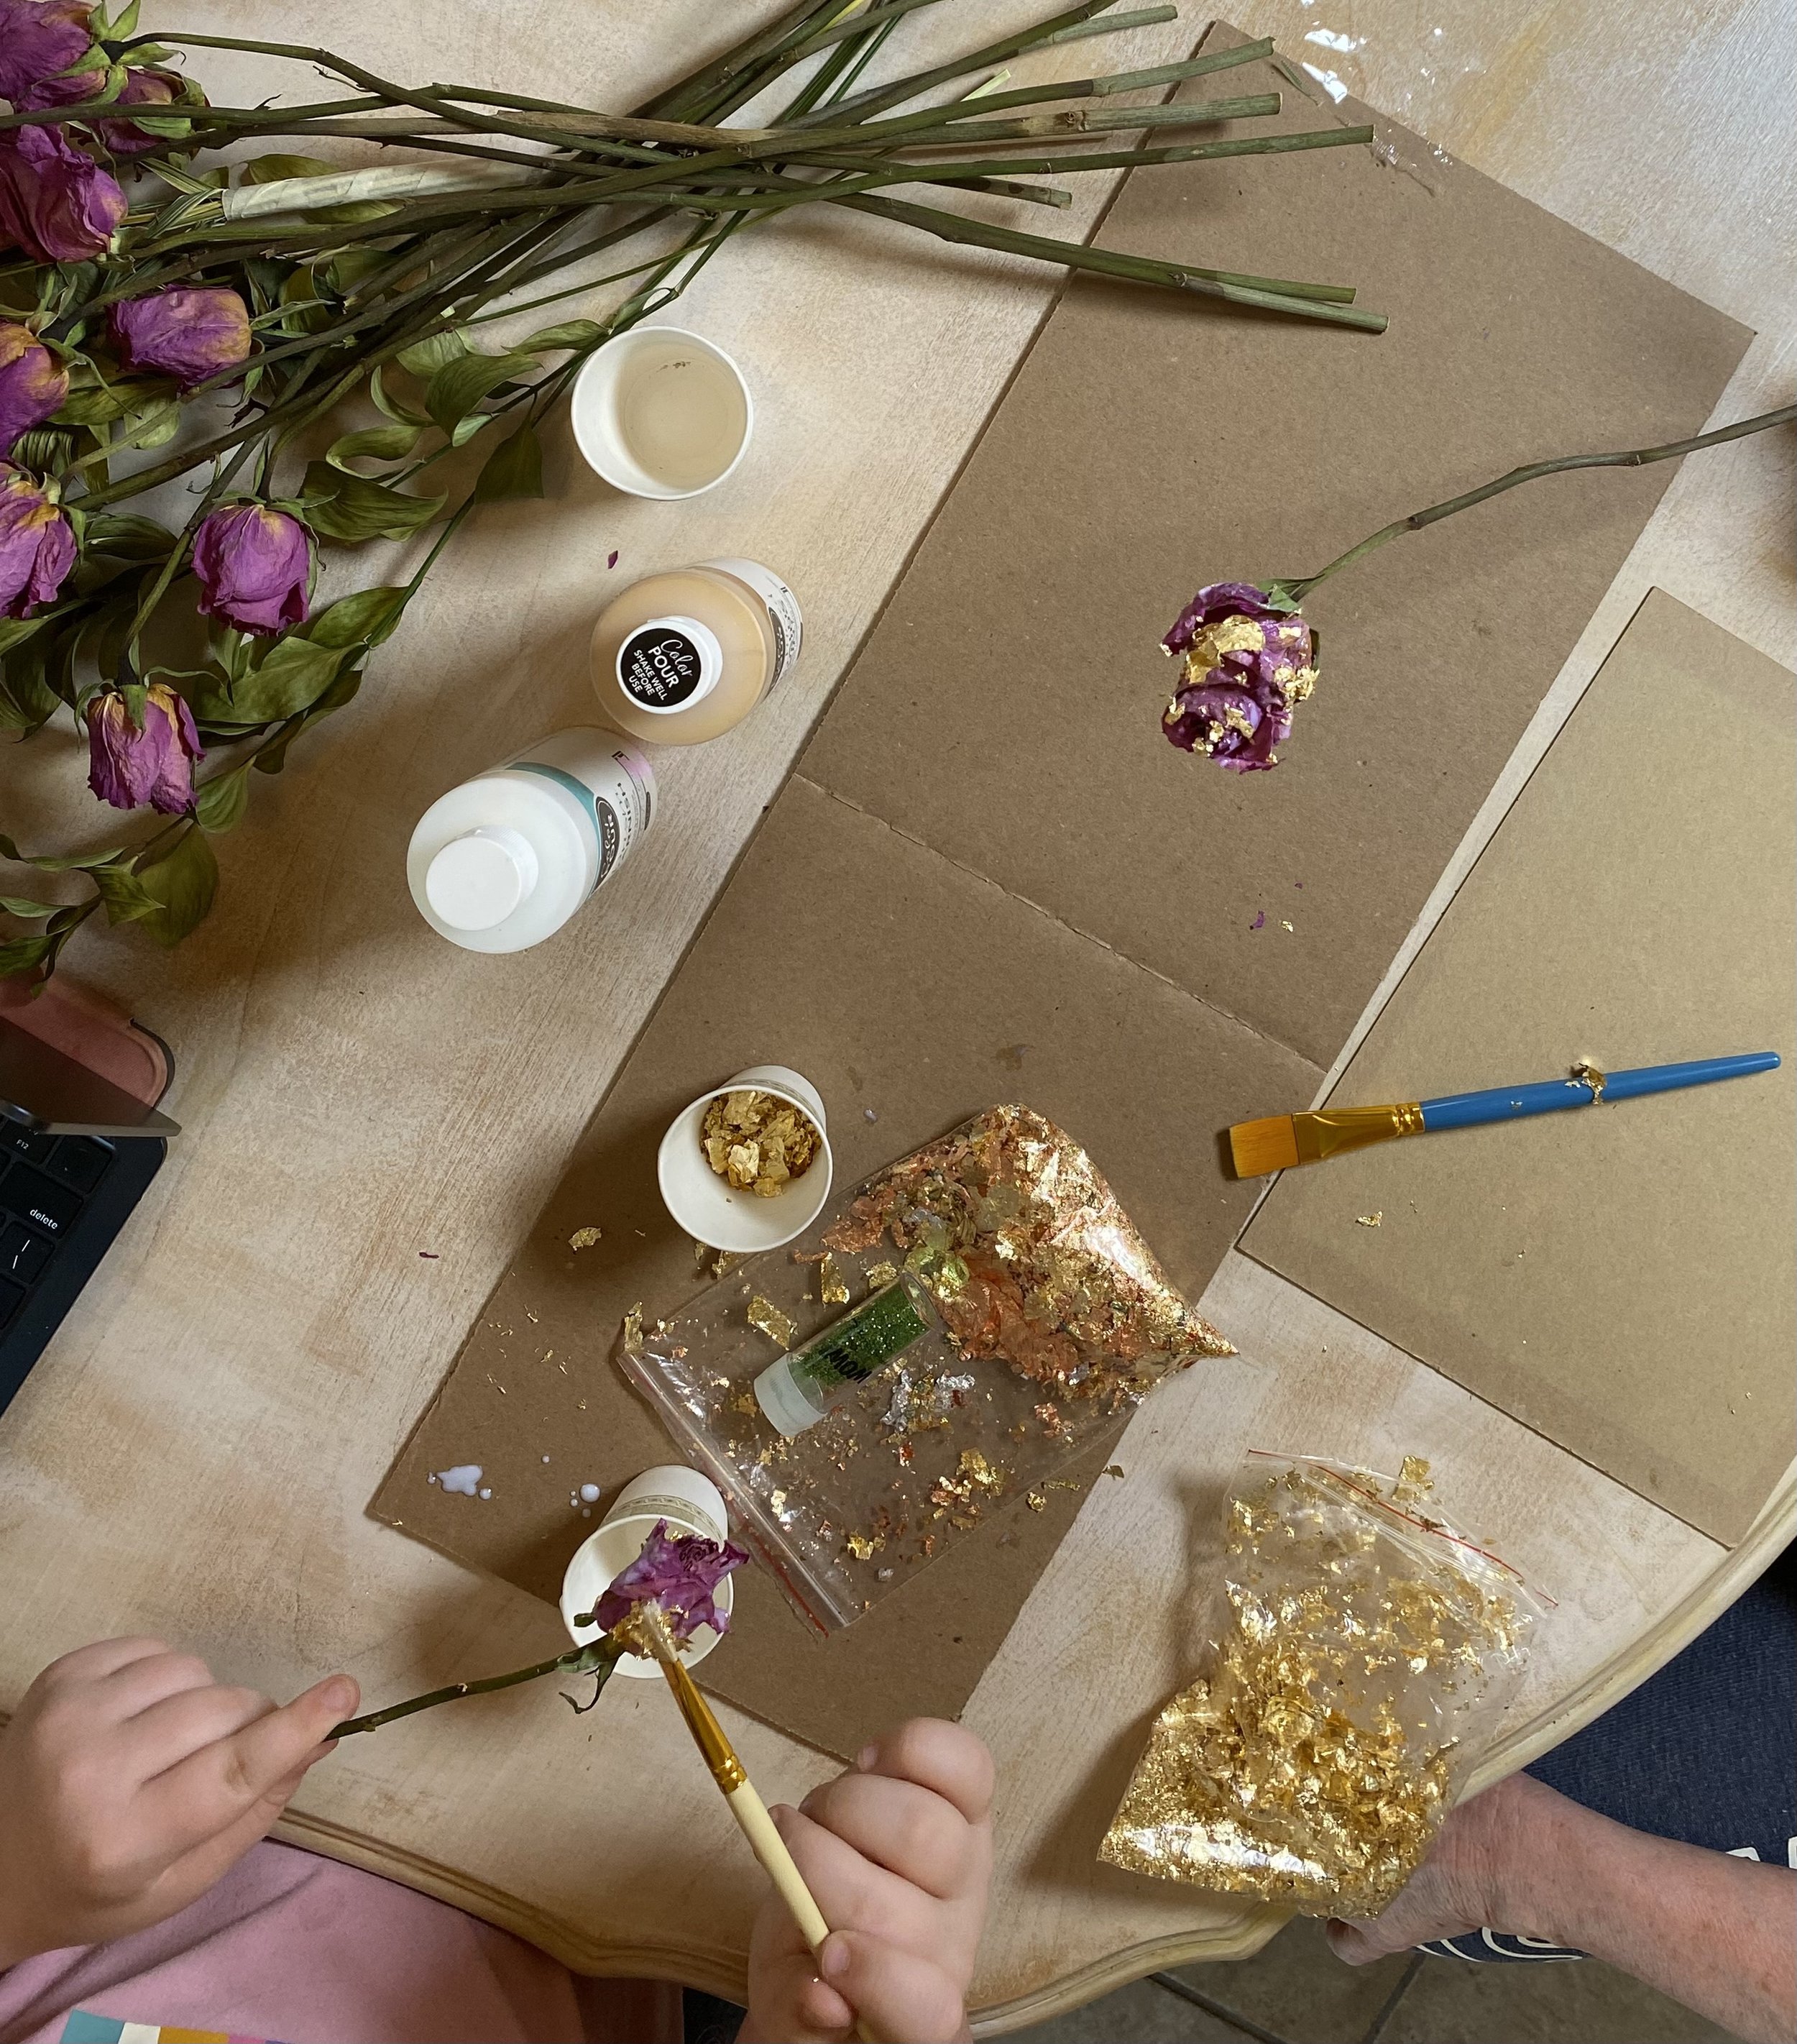
Get your family and friends involved. I had my 8 year old granddaughter join me and she had a blast. It was such a magical day.
Her roses turned out beautiful! What a precious keepsake. These memories are sure to last a lifetime.
I love those baby fingers in the pictures.

Now begin to add your gold leaf to the varnish.
Taking a set of tweezers lift your gold leaf pieces and place them on the varnish.
With a dry paintbrush gently pat the pieces in place. Voila!
(For an extra little pop you can add green glitter or the gold paint to make them stand out. The choice is yours.)
After all of your flowers have been varnished, gold leafed, and painted gather them together as gently as possible and place them back in a well ventilated and dry area. Allow them to dry for several days to a week.
Now it’s time to wrap these babies up!
Gather your flowers together and starting at the base of the flower, wrap the ribbon around the stems (I chose pink but the options are endless).
Start with a knot working your way down the stems finishing with another knot.
Next, place the broach or button in the desired location applying a small dab of glue from a glue gun to secure it on the velvet ribbon.
Next add the floral pins as desired beginning at the top of the ribbon moving to the bottom knot.
Trim your stems with the floral cutters to even the stem lengths.
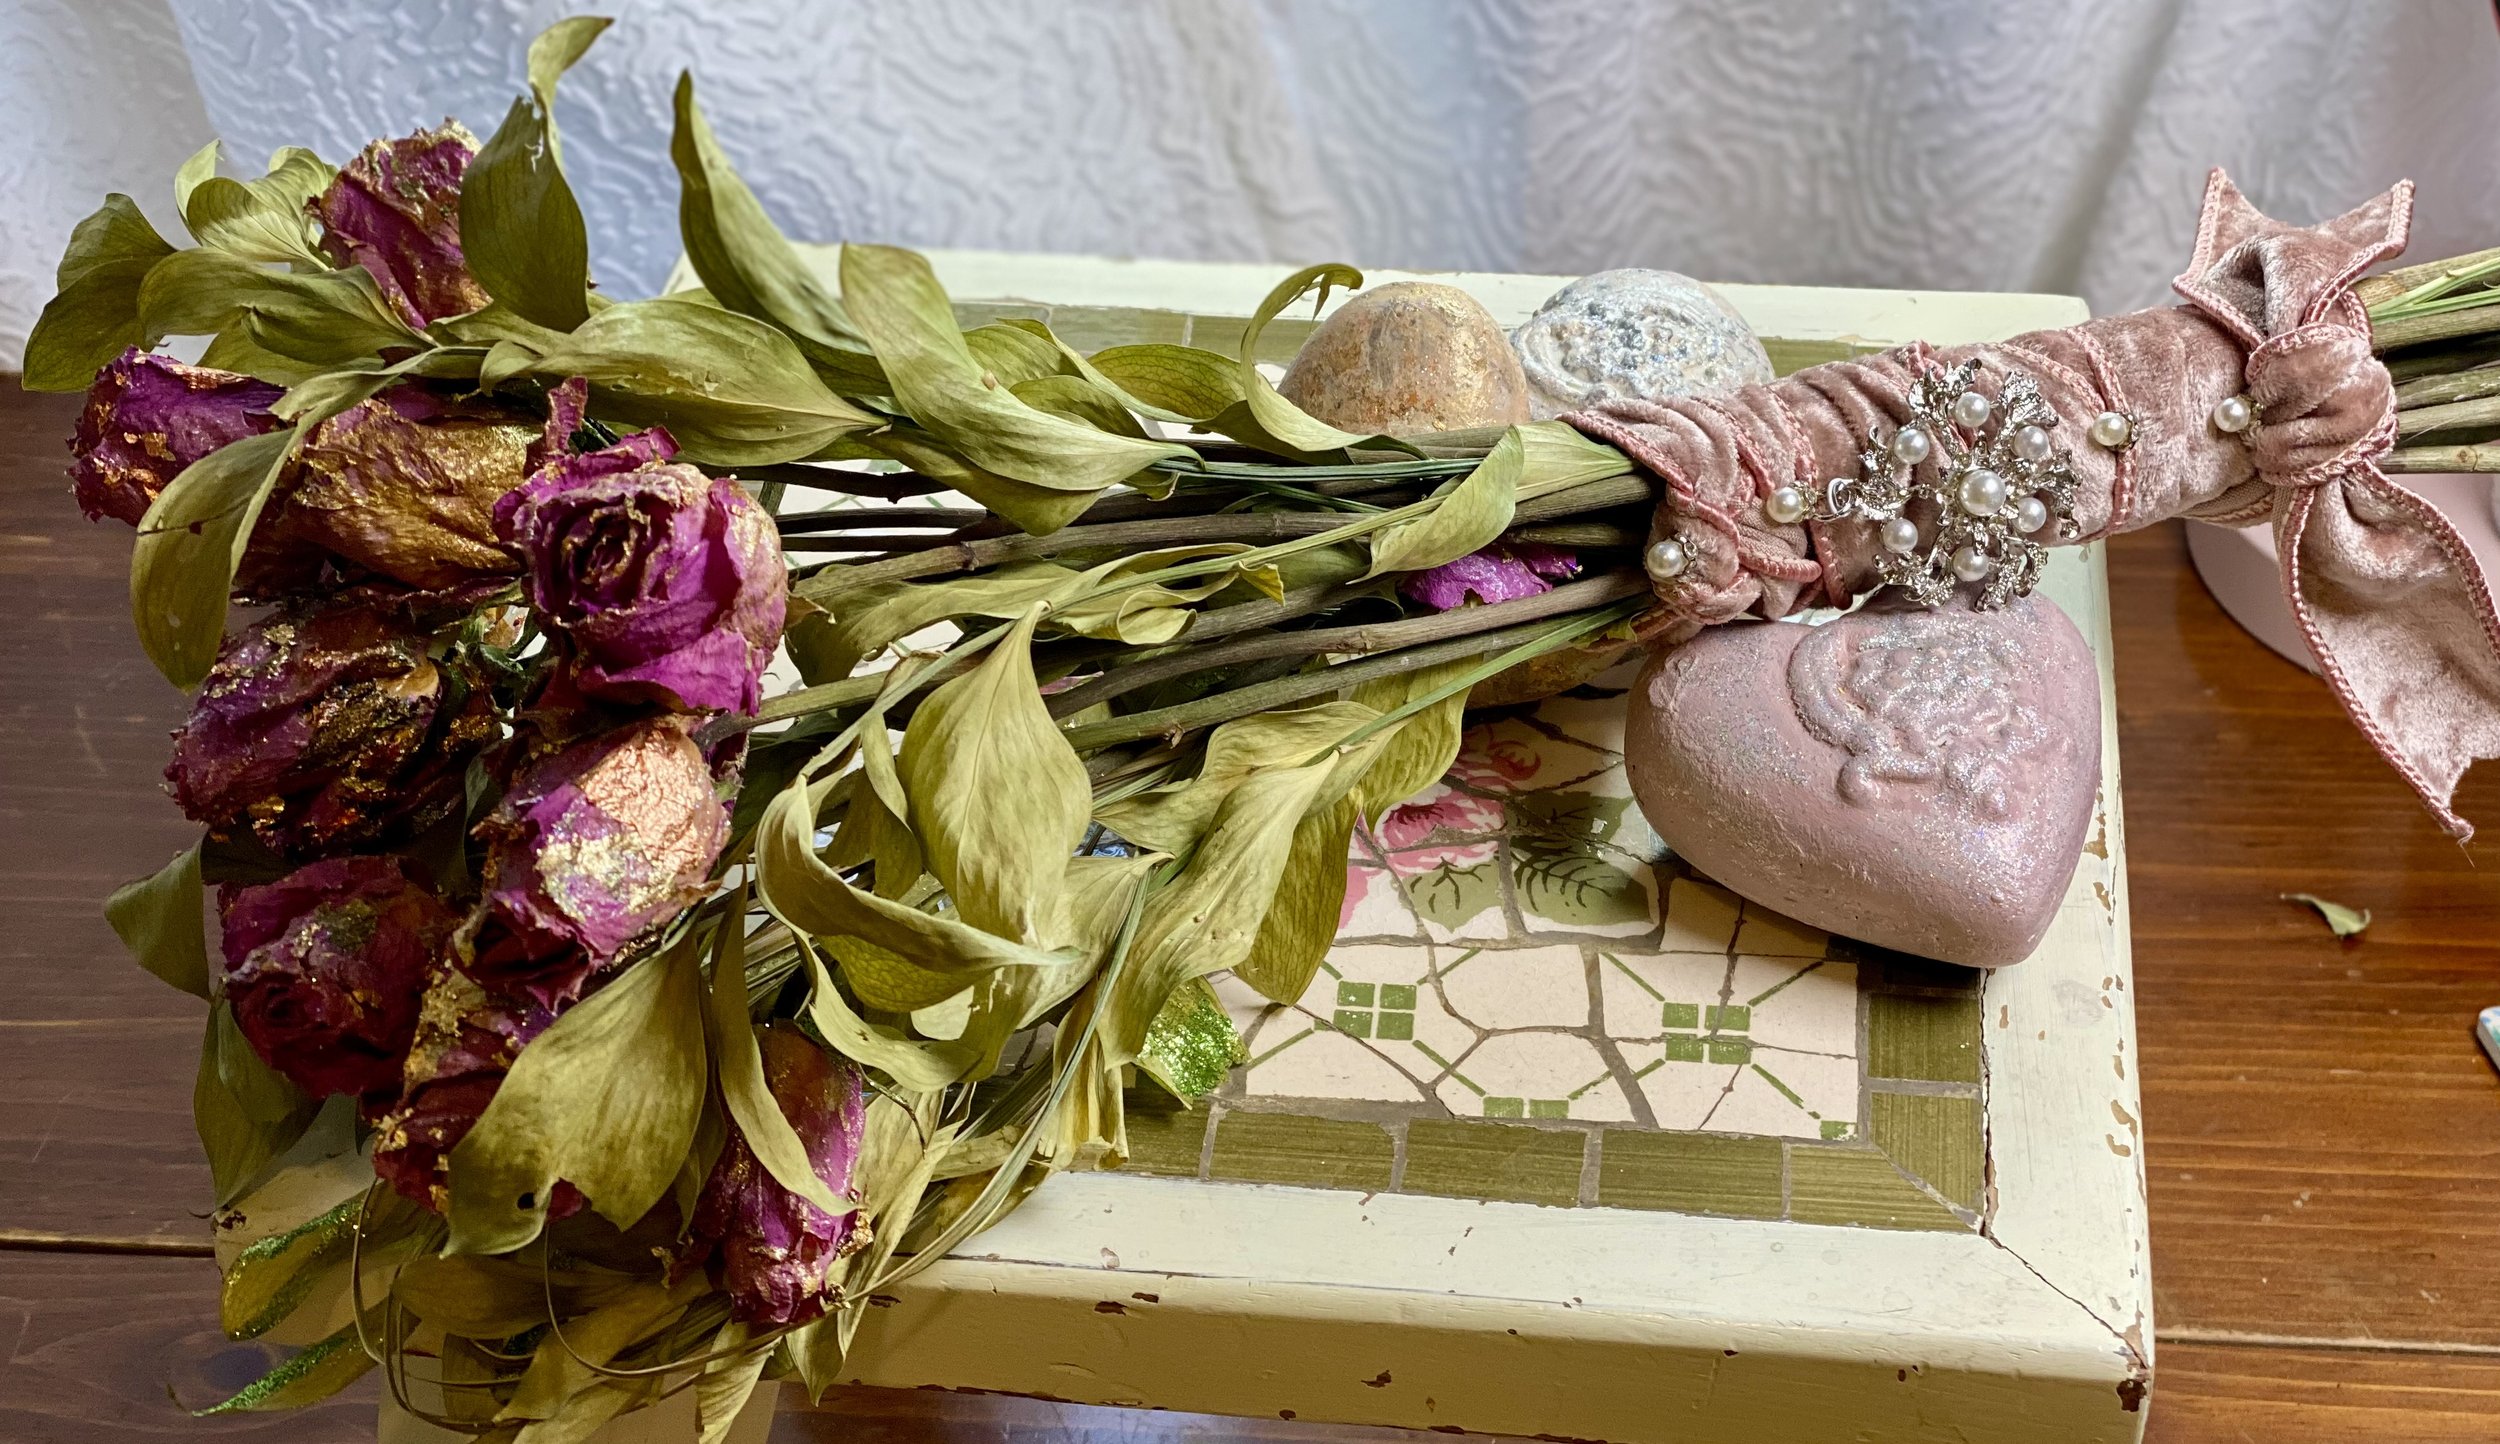
You can see how beautiful the gold leaf and the gold paint made these roses sparkle and shine!
I really encourage YOU to sparkle and shine!
I know I’m so delighted with the way my roses turned out. The experience of sharing time with my granddaughter and creating something special is priceless.
You too can create without boundaries, explore without limits, and most importantly enjoy the innovative process. You can’t mess up in “crafting.” There’s no right or wrong way when envisioning your project or bringing your masterpiece into existence.
You are the boss!
Don't forget to check out some of my favorite products at the bottom!


